Add a dataset based on data files
You can add a new dataset using data files in XLS, XLSX, CSV, TSV, TXT, and SAV formats. For a dataset, you can use as many files as you need.
If you want to add server-based data sources, see Add a dataset based on a server.
Prerequisites
-
You have all the necessary role permissions granted by an administrator in Access Manager.
 Permissions
dataprep.access
dataprep.dataset.create
dataprep.data-connection.create (only if you need to add files or your own connections)
dataprep.dataset.extract (only if you need to create an extract dataset)
-
The data files are prepared as described in the Preparing data files topic.
Procedure
-
On the sidebar, click
 Datasets.
The Datasets pane appears.
-
In the Datasets pane, click New dataset.
The Step 1 – Connect page opens.
-
You have two options to proceed with dataset creation:
-
Upload a new file: If you do not have a file connection, click Browse and select a file. The uploaded file is automatically saved as a data connection. Proceed to Step 2 – Refine.
-
Use a file connection: If you have already uploaded a file previously or have a shared file connection, click To a saved connection, and then click the needed tile.
-
-
If you use a file connection in previous step, select data for your dataset:
-
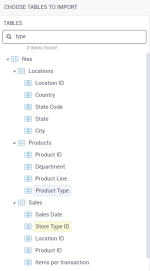
In the Choose tables to import page, under Tables, double-click the data source to expand it.
-
In the tree, click the measures and dimensions that you want to include in the dataset.
All the items that you click appear under Selected items.
If you click a folder, all the items from that folder are added with one click.
 Rename columns
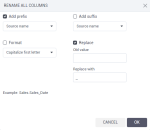
To rename all the columns in a table, point to a table, and then click Rename all columns.
In the Rename all columns dialog, specify how to rename the columns:
- Add prefix – Add a data source name or a custom string in front of the column name.
- Add suffix – Add a data source name or a custom string after the column name.
- Format – Capitalize the column names: only first letter, all uppercase, or all lowercase.
-
Replace – Enter the text that you want to replace and specify a new text. For example, you can replace the underscore with the space character.
 Rename a column
To rename a column in a table, point to the column, and then click Rename column.
In the Rename columns dialog, specify a new name for the column and click OK.
To remove an item from the Selected items section, point to a column, and then click
 Delete. To remove all selected items, click Clear all columns at the bottom of the page.
-
-
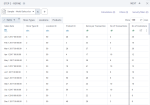
On the Step 2 – Refine page, depending on the file structure, data can be displayed as follows:
-
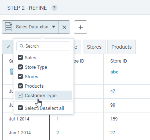
Manage the columns of each data source as needed:
 Add or edit a column in a data source
The following options are available:
-
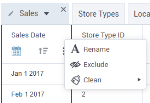
Rename – Click
 column options, and then click Rename. Edit the name as needed.
 -
Exclude – Point to the column, click
 column options, and then click Exclude.
 -
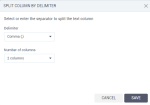
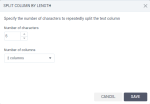
Split – Point to the column, click
 column options, and then click one of the following options:
 -
Clean – Point to the column, click
 column options, and then click one of the following options:
-
Format
- Make uppercase – Make all characters uppercase.
- Make lowercase – Make all characters lowercase.
- Capitalize first letter – Make the first letter uppercase and turn the rest to lowercase.
-
Remove
-
Punctuation – Remove selected types of punctuation in a string column.
-
NULLs – Add a filter to remove all rows with the NULL value in a column.
-
Blanks – Add a filter to remove all blank rows in a string column.
-
Zero values – Add a filter to remove all rows with zero value in a numeric column.
-
Negative values – Add a filter to remove all rows with a negative value in a numeric column.
-
-
Replace
-
Trim
-
Leading & Trailing spaces – Remove spaces at the beginning and at the end of the string in a column.
-
Leading spaces – Remove spaces at the beginning of the string in a column.
-
Trailing spaces – Remove spaces at the end of the string in a column.
-
All spaces – Remove all spaces in a column.
-
Leading character – Remove the specified character at the beginning of the string, in a column.
-
Trailing character – Remove the specified character at the end of the string, in a column.
-
-
Concatenate – Join two strings into one, with or without a separator in between.
-
-
Readd – Click the arrow next to the name of the data source. Then, select the column that you want to readd.
-
Sort alphabetically – Point to the column, and then click
 sort column.
 -
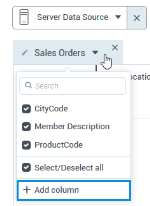
Add new column – (Server data sources only) Click the arrow next to the name of the data source. Then, click the Add column and select the columns in the Add column dialog.
 Check the data role for columns
For each data source, check if the data roles are identified correctly. To adjust them, see Change the data role.
 Check the aggregation type
Check the aggregation type for the columns. Adjust the aggregation if needed. The aggregation type that is defined at the time of a dataset creation is a default type for that measure in a visualization.
For details, see Change the data aggregation.
 Format numbers
You can select a specific format for a numeric column. Point to a column, click
 column options, and then click Format.
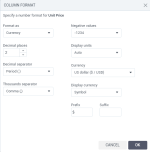
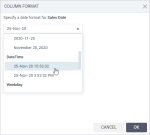
In the Column format dialog, select the format type to apply, customize its options, and click OK.
 Number
You can customize the following format options:
-
Decimal places
- Select the number of decimal places to display in the number. For example, depending on the decimal places, a number may look like 3.14 or 3.14159.
-
Decimal separator
- Select the separator to show for decimals: Comma (,), Period (.), Space (), or Custom to provide another separator symbol.
-
Thousands separator
- Select which separator to show every thousand, for example, 10,000 or 10.000.
- You can select Comma (,), Period (.), Space (), or Custom to provide another separator symbol. To show the number without any separator, select Custom and leave the field empty.
-
Negative values
- Select how to display negative values: -1234, (1234), or 1234-.
-
Display units
- Select a specific unit to abbreviate the numbers: None, Auto, Thousands (K), Millions (M), Billions (B), Billions (G), and Trillions (T).
- For example, if the number is 47,000 and the display units are Thousands (K), the number is shown as 47K.
-
Prefix
- Specify characters that precede each displayed number.
-
Suffix
- Specify characters that follow each displayed number.
 Currency
You can customize the following format options:
-
Decimal places
- Select the number of decimal places to display in the number. For example, depending on the decimal places, a number may look like 3.14 or 3.14159.
-
Decimal separator
- Select the separator to show for decimals: Comma (,), Period (.), Space (), or Custom to provide another separator symbol.
-
Thousands separator
- Select which separator to show every thousand, for example, 10,000 or 10.000.
- You can select Comma (,), Period (.), Space (), or Custom to provide another separator symbol. To show the number without any separator, select Custom and leave the field empty.
-
Negative values
- Select how to display negative values: -1234, (1234), or 1234-.
-
Display units
- Select a specific unit to abbreviate the numbers: None, Auto, Thousands (K), Millions (M), Billions (B), Billions (G), and Trillions (T).
- For example, if the number is 47,000 and the display units are Thousands (K), the number is shown as 47K.
-
Currency
- Select a currency from the list or specify the custom currency.
-
Display currency
-
Select how to display currency: as a symbol ($) or as an international symbol (USD).
-
Prefix
- Specify characters that precede each displayed number.
-
Suffix
- Specify characters that follow each displayed number.
 Percentage
You can customize the following format options:
-
Decimal places
- Select the number of decimal places to display in the number. For example, depending on the decimal places, a number may look like 3.14 or 3.14159.
-
Multiply by 100
- Select whether to multiply the number representing a percentage. For example, the value of 0.05 will be formatted as 5%.
-
-
Manage the data sources as needed:
 Add another file to the dataset
Click
 Add more data, select the file from your computer, and click Upload. After the file is uploaded, click Continue.
You can add server-based data sources and blend them with your file. For details, see Add a dataset based on data files.
 Delete a file from the dataset
To delete a data file or any other data source from the dataset, click
 Remove next to its name.
Important: Deletion is performed without confirmation and cannot be undone. You can readd the file by clicking
 Add more data.
 Edit a data source
The following options are available:
 Add a calculation
You have several options for adding a calculation to a dataset. For details, see About calculations.
 Add a filter
Add a filter to reduce the amount of data available for analysis in a dataset. The resulting dataset and all the visualizations based on it will contain only data that are already filtered. In addition, visualizations will run faster. For details, see Add filters.
 Add a security filter
No security filters mean that all the data in a shared dataset is visible to all its recipients. With a security filter, some recipients have access only to a subset of data that is relevant to them. For example, each department can see the data related to the respective department and not the whole dataset.
For details, see Row-level security filters.
-
If you have more than one data source, you need to join them.
Click Next to go to Step 3 – Join and preview.
-
(Extract Creators only) By default, new datasets use a live connection. You may choose to create an extract. For details, see Extract data for a dataset.
-
Click Finish.
Click OK in the notification message.
The dataset is created.
On this page, you can review and adjust the relationships (joins) between dataset tables, add or remove columns, preview the data source column data, and save your dataset.
-
Check the relationships (joins) that are defined automatically. To adjust the joins or add new ones, see Define joins between data sources.
-
(Optional) You can also manage data sources and columns in this step. For details, see Manage data sources and columns in a dataset (Step 3).
-
(Optional) Click Preview data to preview the dataset.
You can resize the Data preview pane by dragging the pane header.
You can also manage the columns from the preview table. -
If needed, rename the dataset.
-
(Extract Creators only) By default, new datasets use a live connection. You may choose to create an extract. For details, see Extract data for a dataset.
-
Click Finish.
Click OK in the notification message.
The dataset is created.
Note: You can return to the dataset and edit columns at any time later. For details, see Edit dataset.


